Many people use Amazon S3 to store the backups from their WordPress websites.
Most of the good backup plugins integrate with Amazon S3. All you have to do is input your Amazon Access Key ID and Secret Access Key.
The way their accounts are setup leave many people's Amazon accounts wide open if someone were to hack their WordPress site.
You also don't want to use your master credentials on a client's site. You might trust them, but do you trust them with all the backups from all your clients, along with anything else you store in your Amazon S3 account?
As you'd expect from a behemoth like Amazon, there is a way to create logins that can only be used to upload to a specific folder on a specific bucket. Someone with those credentials will never be able to delete the files in that folder either.
How to setup Amazon S3 permissions for WordPress backups:
- Create an S3 Bucket for backups
- Create a Folder for the website
- Create an Access Policy for the site
- Create a Group and attach the Policy
- Create a User and add it to the Group
- Save the new credentials for use in your WordPress backup plugin
Create an S3 Bucket for your backups
The first step is to create a Bucket in S3 to store your backups. You can do a general backups bucket if you have a few websites.
The backups will then sit inside a folder in that bucket.
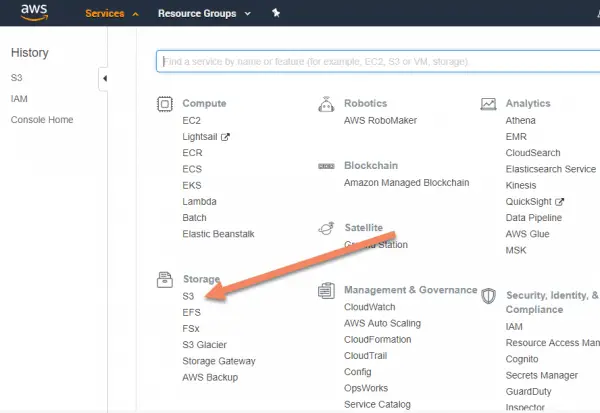
Login to Amazon AWS Management Console and navigate to S3.
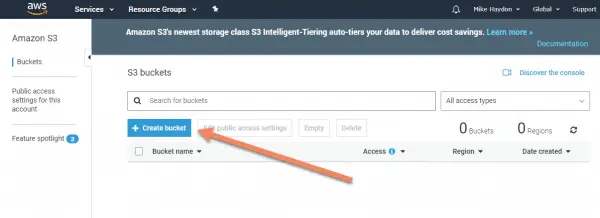
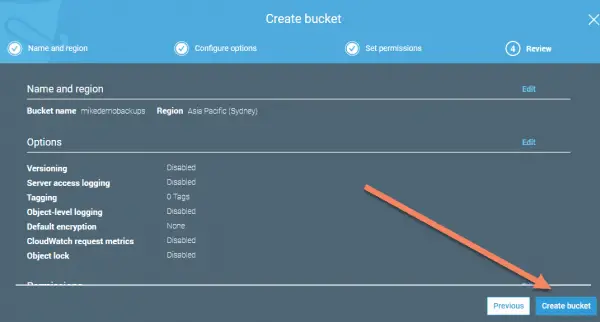
Click "Create bucket"
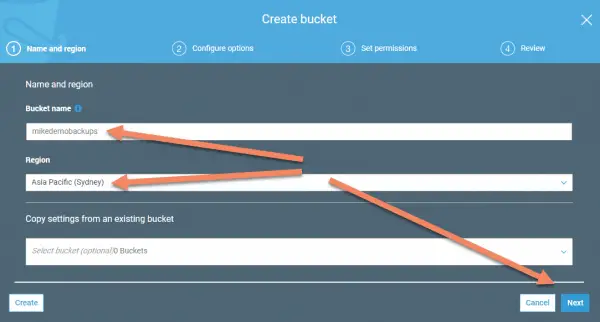
Add a Bucket name. This must be unique across all of Amazon S3. It's best to use something you'll remember belongs to your backups.
Choose a Region where your Bucket will live. This is the geographic location of the S3 server. From experience, it can be quite tedious if you start putting your Buckets in different regions.
For what we need, it doesn't really make a difference which region you choose. That matters more if you're hosting publicly accessible files, for example.
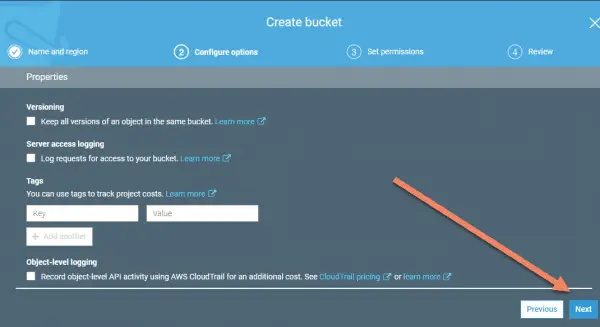
Check the options on the next few screens, but I usually just use the default options.

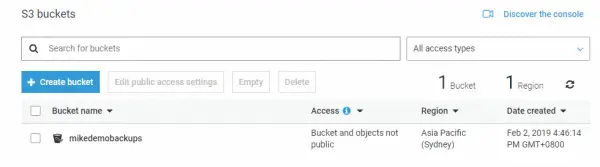
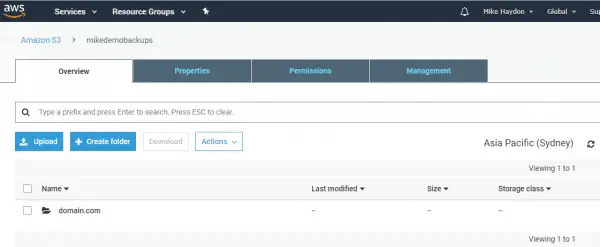
Once you're done, you'll be taken back to your list of Buckets. All your Buckets will be available here.
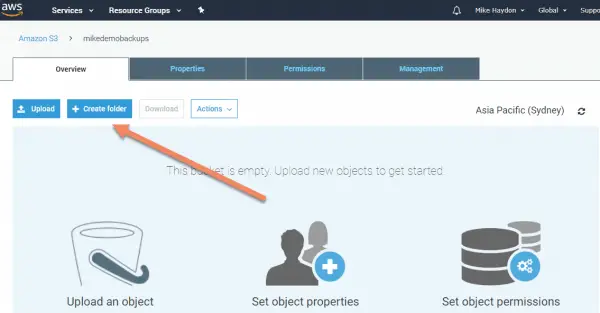
Create a Folder for the website
Now it's time to create a Folder inside the Bucket. This Folder will be specific for this website. If you have multiple WordPress websites that you're backing up, just create a Folder here for each of them.
Click on the Bucket you just created.
Click "Create folder"
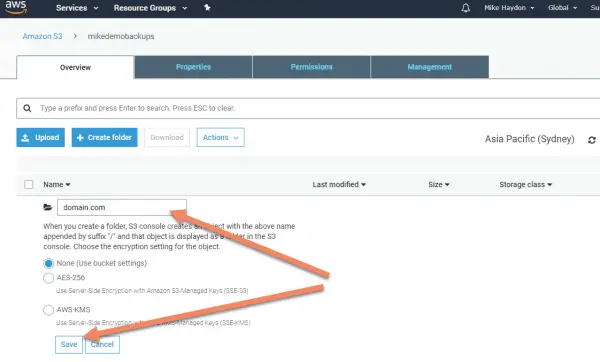
You can call your folder whatever you want. This doesn't need to be unique across all of Amazon S3 like Buckets do.
I like to use the domain name or the name of the site for the folder name.
Click "Save" when you're done.
You'll be returned to the list of the buckets in the folder.
The links above the tabs (in this screen "Amazon S3" and "mikedemobackups") are how you navigate through the Bucket and Folder structure in S3.
Create an Access Policy
Now that we have the location for the backup setup, it's time to setup how the website is going to access it.
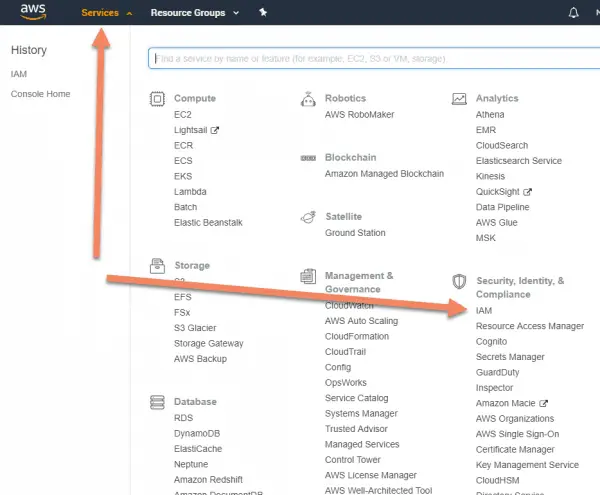
In your Amazon Management Console, navigate to IAM.
IAM stands for Identity and Access Management. It's the process Amazon uses to handle who can login to what and what they can do while in there.
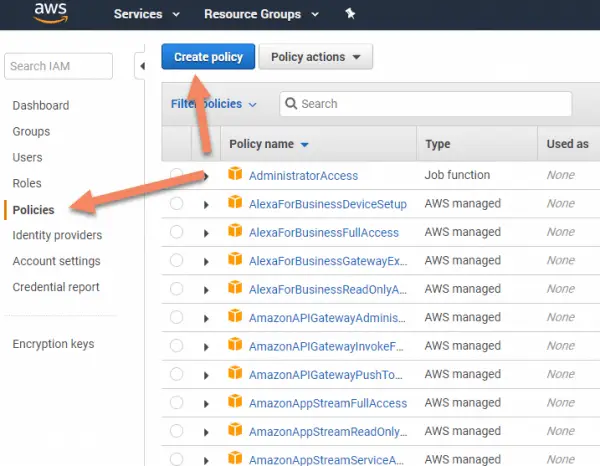
Select Policies and then "Create policy".
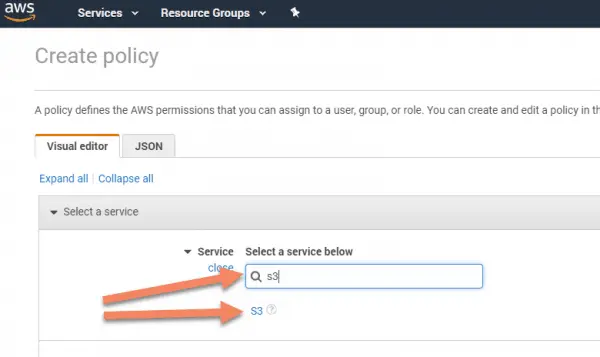
Under Service, type "s3" to filter for S3. Then click S3.
We're going to use the Visual Editor to create this Policy. Scroll down if you prefer to do it by JSON.
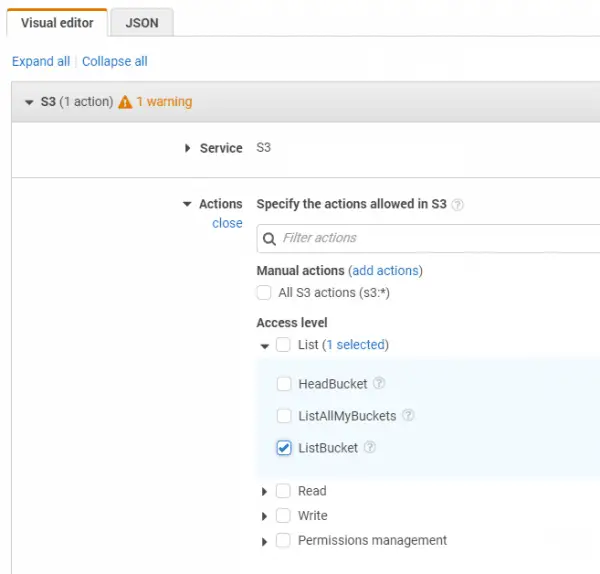
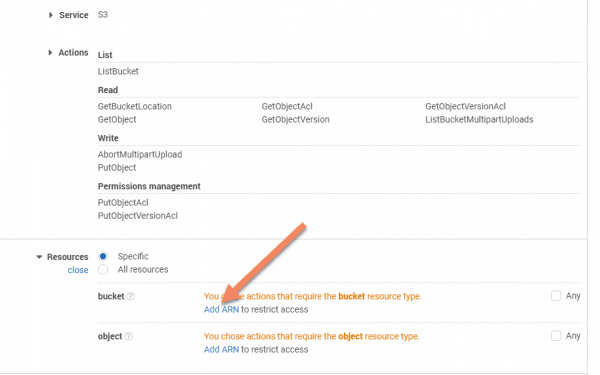
Under Actions, we set what this account can do.
The next few steps will apply to most WordPress Backup plugins.
If you get "Insufficient Access" errors, or something similar, this is where you'll make changes. You can come back and edit this policy later if it doesn't allow what you need.
Under List, select ListBucket.
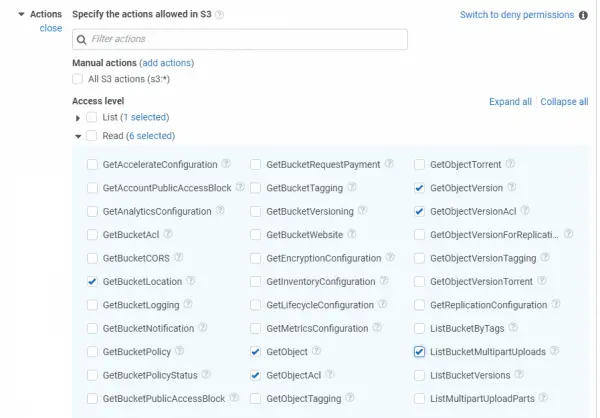
Under Read, select:
- GetBucketLocation
- GetObject
- GetObjectAcl
- GetObjectVersion
- GetObjectVersionAcl
- ListBucketMultipartUploads
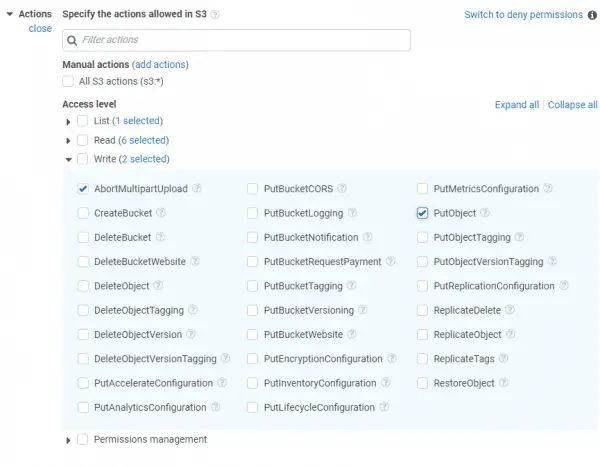
Under Write, select
- AbortMultipartUpload
- PutObject
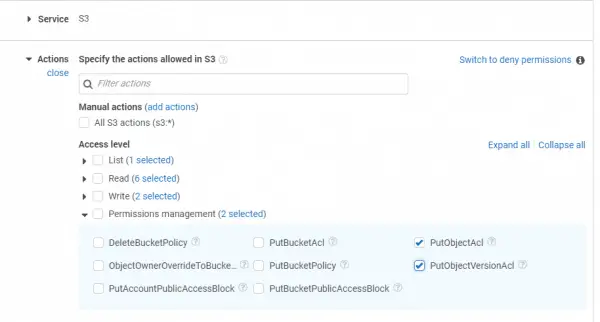
Under Permissions management select
- PutObjectAcl
- PutObjectVersionAcl
That's it for the access. Now we have to attach the Policy to the Bucket and Folder we setup earlier.
ARN means Amazon Resource Names. It's basically the unique naming conventions for things like Buckets and Folders.
Click Add ARN next to bucket.
Type your Bucket name where listed. It will automatically fill the correct ARN for the backup Bucket.
Click "Add".

Click Add ARN next to object. This will be for the Folder.
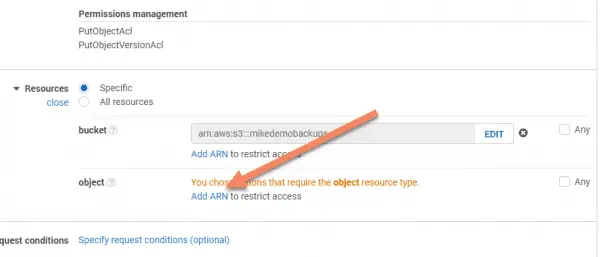
Type your Bucket name in the Bucket name field and the Folder name in the Object name field.
You'll see the ARN automatically filled in as you type.
Click "Add".

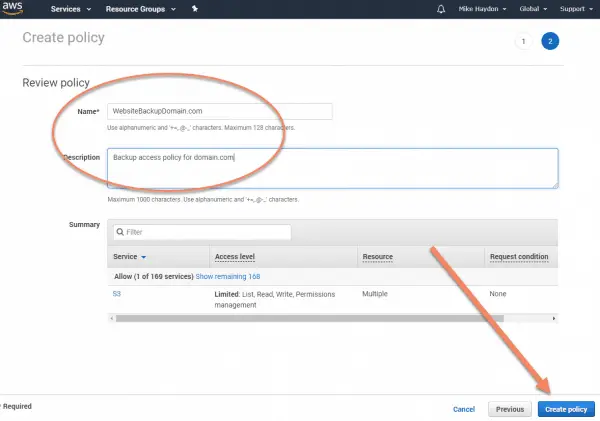
Once you've gone through those steps, click "Review policy".
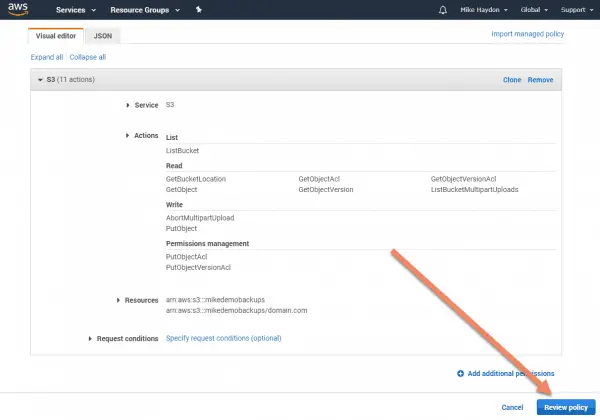
Add a name and a description to the Policy.
You'll be filtering by name later, so I recommend you follow the same format for each of your backup policies, just changing the domain name at the end.
Once you're done, click "Create policy".
Create an Access Policy with JSON
If you're a bit of a power user, you can create this Policy with JSON (JavaScript Object Notation). It looks like this:

Here is the code for you to copy and paste. Make sure you change the entries in "Resource" to your Bucket and Folder.
{
    "Version": "2012-10-17",
    "Statement": [
        {
            "Sid": "VisualEditor0",
            "Effect": "Allow",
            "Action": [
                "s3:PutObject",
                "s3:GetObjectAcl",
                "s3:GetObject",
                "s3:ListBucketMultipartUploads",
                "s3:AbortMultipartUpload",
                "s3:PutObjectVersionAcl",
                "s3:GetObjectVersionAcl",
                "s3:ListBucket",
                "s3:GetBucketLocation",
                "s3:PutObjectAcl",
                "s3:GetObjectVersion"
            ],
            "Resource": [
                "arn:aws:s3:::mikedemobackups/domain.com",
                "arn:aws:s3:::mikedemobackups"
            ]
        }
    ]
}
Don't worry if this code confuses you. It's just a different way of doing the same thing as we did in the Visual Editor.
Create a Group and attach the Policy
Congratulations, the hard part is done.
Now to create a Group for the Policy.
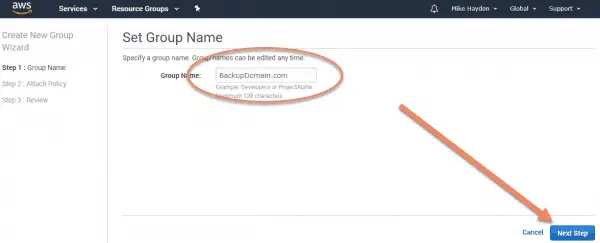
Click Groups then "Create New Group".

Set the Group Name. This can be the same name as your Policy, or you might want to shorten it, as I've done.
Click "Next Step".
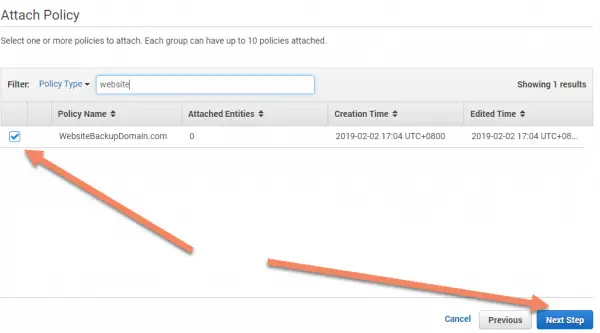
Use the filter to find the Policy you created earlier. When you first see this screen, it will have all 424 of the pre-defined Amazon Policies.
Once you've found your Policy, select it, then click "Next Step".
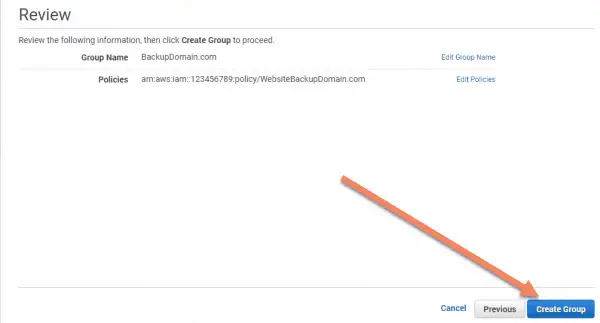
There's not much to see on this screen. Just make sure you've selected the right things.
Click "Create Group".
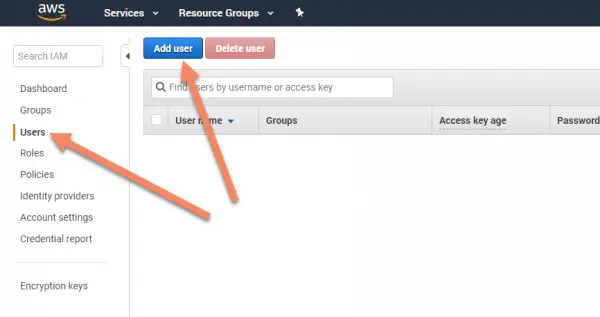
Create a User and add it to the Group
Many people start by creating the User. By doing so, they usually have to complete all the other steps on the fly.
This is the last step in getting our credentials.
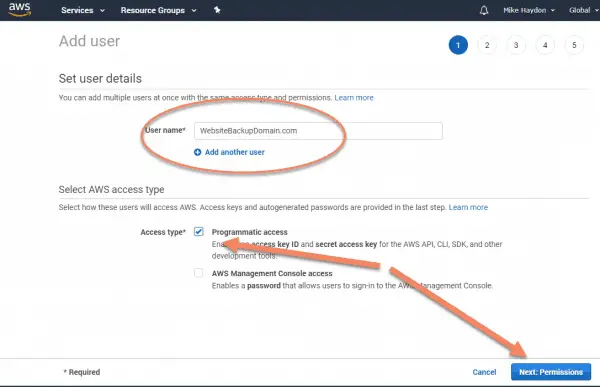
Click Users, then click "Add user".
Add a User name. I like to keep it consistent and use the same name as for the previous steps.
Select Programmatic access, then click "Next: Permissions".
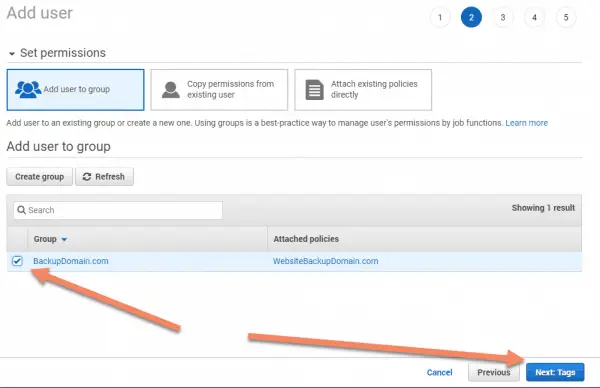
The button Add user to group should already be selected.
Select the Group you created earlier, then click "Next: Tags".
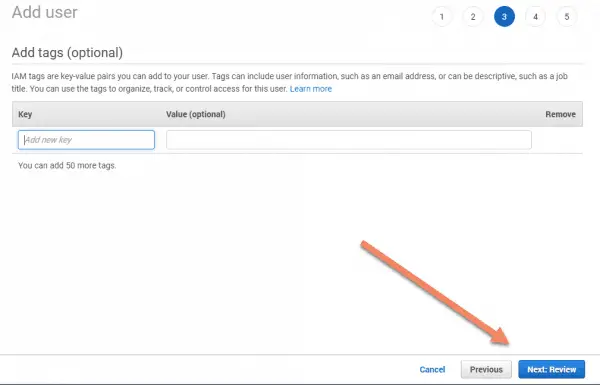
You can add tags to track access if you like, but I don't usually add anything here.
Click "Next: Review".
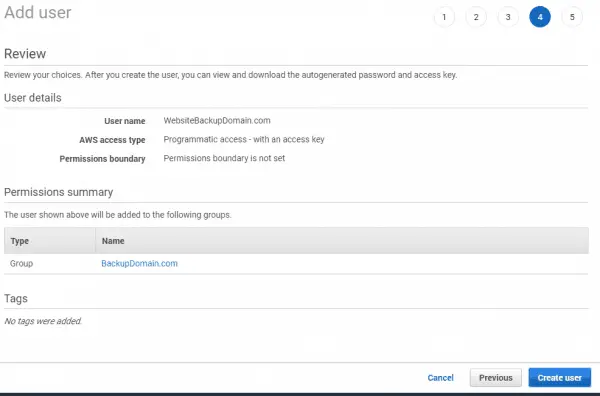
Check everything looks good, then click "Create user".
You'll then see your Access key ID and Secret access key.
You'll need to click Show to see your Secret access key.
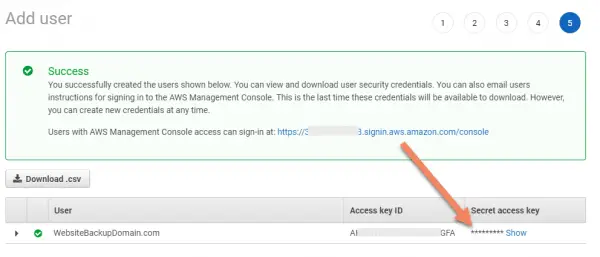
Make sure to save the Access key ID and Secret access key somewhere safe. You'll need to add these to your WordPress backup plugin.
This will be the ONLY time you'll see the Secret Access Key. Make sure you save it
What if you lose your Access Key ID and Secret Access Key?
Unfortunately, if you lose your Secret Access Key, you can't get it back.
If you lose your Secret Access Key, you'll need to create a new access key. This is really quick and easy.
To create a new Access Key, login to the Amazon Console.
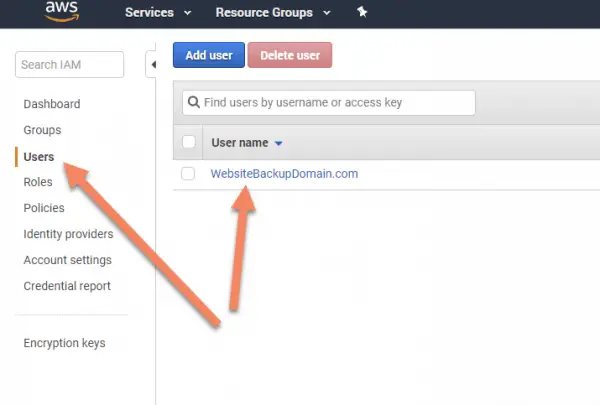
Navigate to Users and click on the User for your website.
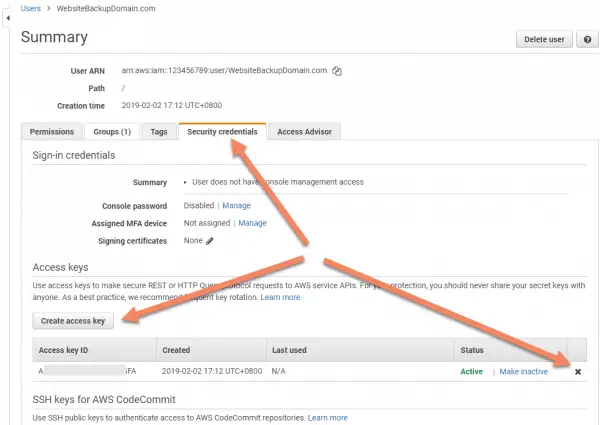
Click on the Security credentials tab, click the X next to Make inactive for the old Access Key to delete it. Click "Delete" on the popup.
Next, click "Create access key".
After you click "Create access key", you'll get a popup with the details of the new key.
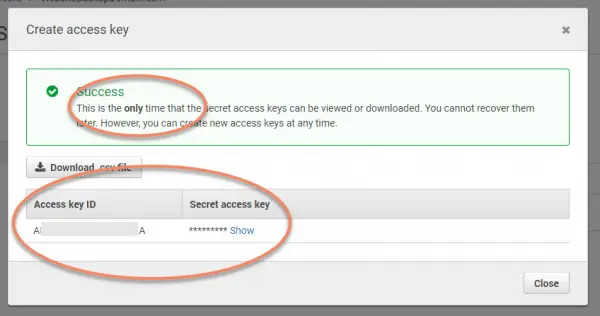
Be careful not to click anywhere outside the box until you've saved your Secret Access Key. Clicking outside that box will cause the popup to disappear.
Make sure you at least save the Secret Access Key. You'll be able to see the Access Key ID later in your account, but this is the only time you'll see the Secret Access Key.
Note: you can only have two Access Keys for this type of account. Just delete any unused Access Keys and you'll be fine. If you need more Access Keys, you'll need to create a new User.