Sometimes it's nice to add a bit of custom styling to the WordPress admin area to make things stand out a bit better.
Today I needed to resize a meta box in the sidebar of the Gutenberg editor.
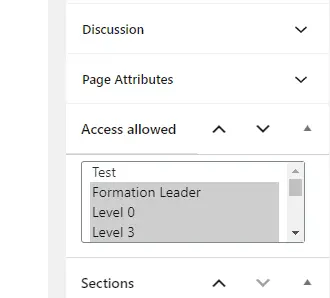
We had lots of options for membership levels, but it was annoying to have to scroll through to see them to choose them.
How to add custom CSS to the WordPress admin area:
- Add a stylesheet with your styling to your child theme called admin-style.css.
- Create a function in functions.php to add wp_enqueue_style for admin-style.css.
- Use add_action to connect the function to the admin_enqueue_scripts hook.
If you just want the code without the explanation, it is:
add_action( 'admin_enqueue_scripts', 'my_admin_style');

function my_admin_style() {
  wp_enqueue_style( 'admin-style', get_stylesheet_directory_uri() . '/admin-style.css' );
}
Let's go through the steps in detail.
Add a stylesheet with your styling
For this method, we're going to be adding and editing files in the theme. You should always use a child theme for this. Please see my tutorial on how to create a child theme if you don't have one yet. It's pretty simple and will only take a few minutes.
We will be adding an external stylesheet to the admin area.
Start by adding a file to your child theme.
If you're not sure how to add files to your theme, I have tutorials on how to edit files in cPanel and how to edit files through FTP that might be useful.
You can't add files using the inbuilt WordPress Theme Editor, so you'll have to add them using one of those methods.
You can create or add the admin stylesheet as a blank file and then edit it in the WordPress Theme Editor if you prefer. The advantage of doing it that way is the Theme Editor won't let you save a file that will break your site.
I've called the file "admin-style.css" for ease of use. You can call it whatever you like and put it in a subfolder if it makes sense to your theme. Just remember what you called it and where you put it for the next step.
In the file, I've added this CSS:
/* Admin Styles */
#hforce_content_access_restriction {
  height: 250px;
}
The default style that sets the height of the "select multiple" metaboxes in the Gutenberg editor is .wp-core-ui select[multiple] but I had an ID that I could hook into just for this one.
You don't need to add a special set of tags to this stylesheet like you do with style.css. You can just get straight into the CSS like you might write in the Advanced CSS module in the Theme Customizer.
Create a function to enqueue the stylesheet
In functions.php of you child theme, we're going to enqueue the admin stylesheet in a similar way to how you enqueued style.css for the child theme.
Don't use the same function to do this, because we only want the admin styles outputting to the admin area, not all the frontend styles that you have in style.css.
Because we're doing this in a child theme, the code is:
function my_admin_style() {
  wp_enqueue_style( 'admin-style', get_stylesheet_directory_uri() . '/admin-style.css' );
}
If you were developing your own theme, the code you'd use would be:
function my_admin_style() {
  wp_enqueue_style( 'admin-style', get_template_directory_uri() . '/admin-style.css' );
}
Make sure you replace '/admin-style.css' with the name and location of your stylesheet, if you did something different.
Connect the function to the hook
The final step is to add an action to trigger the function.
Add this code to your functions.php file:
add_action( 'admin_enqueue_scripts', 'my_admin_style');Save that and you should see your admin style reflected in the admin area.
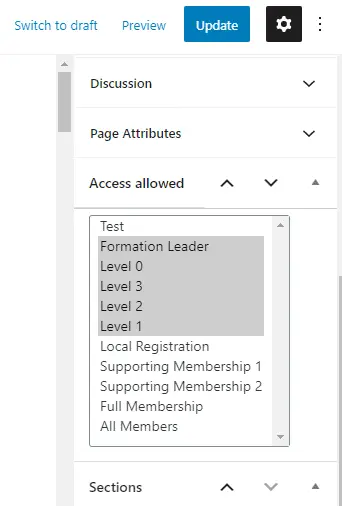
Now the metabox on the Gutenberg editor is a more useable height.

Thanks Mike,
To the point and very helpful, thank you.
Thanks for the information.
Thanks, Mike!
I used to hide a useless and irritating admin area banner!
#plugin-header {
display: none;
}
What a relief!
Best,
Akhil.